CNC Pen Plotter Using Arduino
A CNC (computer numerical control) pen plotter is a machine that uses a pen or marker to draw or write on a surface, such as paper or fabric. The machine is controlled by a computer, typically using a microcontroller, such as an Arduino. CNC pen plotters are commonly used for various applications, such as drawing, writing, and engraving.
Building a CNC pen plotter using an Arduino is a popular DIY (do-it-yourself) project that can be done with a few basic tools and components. The process involves building the mechanical structure of the plotter, such as the frame and the moving parts, and then connecting it to the Arduino board.
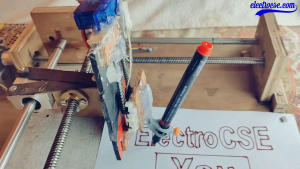
The mechanical structure of a CNC pen plotter typically consists of a frame, two stepper motors, and two lead screws. The stepper motors are used to control the movement of the plotter, while the lead screws are used to convert the rotational motion of the motors into linear motion. The frame is used to hold all the components in place and provide a stable base for the plotter.
The next step is to connect the stepper motors to the Arduino board. The stepper motors are connected to the Arduino through a motor driver, such as an L293D. The motor driver is used to control the speed and direction of the motors. The motor driver also provides power to the motors, allowing them to move.
Once the motors are connected to the Arduino, it’s time to program the microcontroller. The Arduino code is used to control the movement of the plotter, as well as the speed and direction of the motors. The code is typically written in C++ or a similar programming language and is uploaded to the Arduino board using a USB cable.
The last step is to connect the pen or marker to the plotter. This is typically done by attaching the pen or marker to a servo motor, which is then connected to the Arduino board. The servo motor is used to control the movement of the pen or marker, allowing it to move up and down.
Once the CNC pen plotter is fully assembled and programmed, it can be used to draw or write on a surface. The plotter can be controlled using a computer or a mobile device, such as a smartphone or tablet. The plotter can be used to create a wide range of designs, including text, images, and logos.
In conclusion, building a CNC pen plotter using an Arduino is a fun and rewarding DIY project that can be done with a few basic tools and components. The plotter can be used for a wide range of applications, such as drawing, writing, and engraving. With a little bit of creativity and a lot of patience, you can create a unique and functional plotter that can be used for a variety of projects.
Required Things For CNC Pen Plotter Using Arduino
https://linkat.in/CNC-ElectroCSE
Time To Assemble Hardware
Now after purchasing the above things time to assemble all, for assembling you can watch my CNC part-1 video from 5:08.
While assembling must take care of smooth rotation as well as the load on the X-axis stepper motor must be less than 4.2 Kg. If the load on the X-axis motor increases then it might be moving slower and consume more current then motor driver maybe got more heated and the driver IC burns.
Circuit Diagram
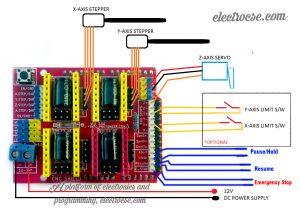
Now connect X-axis, Y-axis, Z-axis Servo Motor, SMPS, etc with CNC shield as shown in the above diagram. While connecting servo motor for Z-axis must take care of which wire of servo motor and where to connect in CNC shield.

Power wire or Red wire of servo motor with +5V on CNC shield.
Ground or Brown wire of servo motor with GND on CNC shield.
Signal or Yellow wire of servo motor with Z+ on CNC shield.
Now you have short these two pins using any jumper or soldering for micro-stepping. It will help the stepper motors to move smoothly in smaller steps. Basically, micro-stepping allows the motors to take a very small step that is 1/16th part of a step.
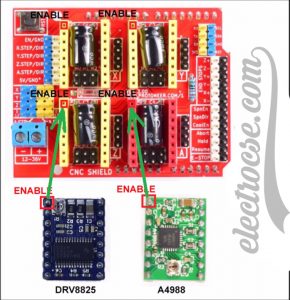
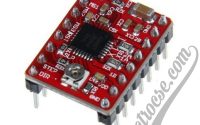
Now place the motor driver A4988 or DRV8825 on the CNC shield in the proper way, You will an EN (Enable) pin on the shield for each motor driver place and in drivers also there will be written EN, So you have to place in such a way so that EN pin of the driver EN pin of shield get connected.
Required Softwares And Libraries For The Project
1. Arduino IDE
Download Arduino IDE
2. GRBL Controller
Download From Here (Recommended)
3. GRBL Library
Download From Here
4. Inkscape
Download Inkscape Software
5. Inkscape Extension
Download From Here
6. Sample GCodes
Download From Here
Download All Files For CNC
Must watch my CNC part-2 video, In this video, you will learn how and where to place these files in your computer as well as how to use these software properly.
If you need any help from my side you can join our Facebook group and post your queries there, I’ll try to respond as soon as possible.
Contact me: https://linkat.in/Contact-ElectroCSE




Hello
I want to buy cnc from you. Kindly guide me.
My con.no and what’s app no is 9898631147. Please contact me.
please contact me
i am interested this cnc machine