Top 5 DIY Electronics Projects for Engineering Students
As an engineering student, you have the opportunity to explore the world of electronics and learn about the latest technologies. DIY electronics projects are a great way to gain hands-on experience and develop your skills. Here are the top 10 DIY electronics project ideas for engineering students:
Top 5 DIY Electronics Projects for Engineering Students
1. Smart Home Automation
Smart home automation is the process of controlling various household appliances and devices through the use of technology, such as smartphones, tablets, and voice assistants. By automating different aspects of a home, homeowners can enjoy increased convenience, energy efficiency, and safety. In this blog post, we will explore some of the most popular smart home automation technologies and how they can be used to create a more connected and efficient home. Read More.
2. Electronic lock
An electronic lock is a type of locking system that uses electronic components and circuits instead of traditional mechanical locks. These locks have become increasingly popular in recent years, due to the high level of security and convenience they offer compared to traditional locks. In this blog post, we will explore the various types of electronic locks and the benefits they offer.

Types of Electronic Locks
-
- Keypad Locks: Keypad locks use a numerical keypad to unlock the door. The user enters a code to unlock the door, and the lock opens if the code is correct. Keypad locks are convenient because they don’t require a physical key, making it easy to grant access to multiple people or change the code when necessary.
- Smart Lock: Smart locks are internet-connected locks that can be controlled through a smartphone or other smart device. With a smart lock, you can grant access to friends, family, or service providers from anywhere in the world, and you can also receive notifications when the lock is used.
- Biometric Locks: Biometric locks use biometric data, such as a fingerprint or iris scan, to grant access. These locks offer a high level of security, as biometric data is unique to each individual and cannot be lost or stolen.
- Card Access Locks: Card access locks use a card, similar to a credit card, to grant access. The user simply swipes the card in front of the lock, and the lock opens if the card is authorized. Card access locks are commonly used in commercial buildings, such as office buildings and hotels.
Benefits of Electronic Locks
-
- Increased Security: Electronic locks offer a high level of security, as they are less susceptible to tampering or breaking than traditional locks. With features such as biometric data and secure codes, electronic locks offer a secure solution for keeping your home or business safe.
- Convenience: Electronic locks offer a level of convenience that is unmatched by traditional locks. With smart locks, you can control access to your home or business from anywhere in the world, and you can also receive notifications when the lock is used.
- Ease of Use: Electronic locks are easy to use, and many of them can be programmed with different codes for different people. With a smart lock, you can also control access to your home or business from your smartphone, making it easy to grant access to friends, family, or service providers.
In conclusion, electronic locks offer a high level of security and convenience, making them a popular choice for both homes and businesses. With various types of electronic locks available, including keypad locks, smart locks, biometric locks, and card access locks, there is a solution for everyone’s needs. Whether you are looking to improve the security of your home or business, or you want a more convenient way to control access, electronic locks are an excellent option to consider.
3. Smart irrigation system
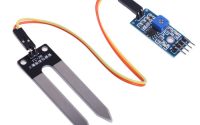
A smart irrigation system is a technologically advanced solution for watering crops, gardens, and lawns. These systems use sensors and data analysis to determine the right amount of water to be applied to a particular area, taking into account the local weather conditions, soil moisture, and the type of plants being grown. In this way, smart irrigation systems help conserve water, reduce water waste, and improve crop yield and quality.
One of the key benefits of smart irrigation systems is their ability to optimize water usage. Traditional irrigation methods are often wasteful, applying too much water at the wrong times or not enough water when it is needed. Smart irrigation systems, on the other hand, use real-time data to make informed decisions about watering, ensuring that crops receive the right amount of water at the right time.
Another advantage of smart irrigation systems is their ability to save time and effort. Instead of manually watering plants, these systems can be programmed to run automatically, freeing up time for other tasks. This can be especially useful for large-scale agricultural operations, where the manual process of the watering can be time-consuming and labor-intensive.
Smart irrigation systems also help to conserve water by reducing the amount of water that is lost to evaporation, runoff, and other forms of waste. By using sensors to monitor soil moisture and weather conditions, these systems can apply water only when it is needed, reducing the amount of water that is lost due to over-watering or runoff.
Finally, smart irrigation systems can also help to improve crop yield and quality. By providing plants with the right amount of water at the right time, these systems can help to promote healthy growth and maximize crop yields. This is especially important for crops that are grown for commercial purposes, where maximizing yields can have a significant impact on the bottom line.
Overall, smart irrigation systems are a powerful tool for improving water efficiency, reducing waste, and improving crop yields. Whether you are a small-scale gardener or a large-scale agricultural operation, these systems can help you achieve your goals while conserving resources and saving time and effort.
4. Automatic Solar Tracker
Automatic Solar Tracker is a device that helps to improve the efficiency of solar panels by automatically adjusting the angle of the panel to face the sun. The tracker follows the sun’s movement throughout the day, ensuring that the panel is always receiving maximum sunlight. This results in a significant increase in the energy output of the solar panel, compared to a fixed panel.
There are two main types of automatic solar trackers: single-axis and dual-axis. Single-axis trackers only adjust the panel’s angle in one direction, typically up and down. Dual-axis trackers, on the other hand, can adjust the panel’s angle in two directions, allowing it to follow the sun as it moves across the sky.
The benefits of using an automatic solar tracker are clear. The increased energy output of the panel means that a smaller number of panels can be used to produce the same amount of energy. This can lead to cost savings, both in terms of the number of panels required and the overall system cost. In addition, an automatic solar tracker can also help to reduce the amount of shading that occurs on the panel, further increasing its efficiency.
Overall, an automatic solar tracker is a smart investment for anyone looking to improve the performance of their solar panel system. Whether you’re a homeowner, a business owner, or an agricultural producer, a well-designed solar tracker can help you save money, reduce your carbon footprint, and ensure a more sustainable future.
5. Robotic Arm
Robotic Arm Project: A Guide to Building Your Own Automated Machine. Robotic arms are becoming increasingly popular in a variety of industries, from manufacturing to healthcare. With their precision and efficiency, they can perform tasks that would be difficult or impossible for humans to do. Building a robotic arm can be a challenging, but rewarding project that will give you a deeper understanding of the technology behind these machines.
Here are some steps to guide you through the process of building your own robotic arm:
- Design: Start by creating a design plan that outlines the size and shape of the arm, the number of joints, and the type of motors you will use.
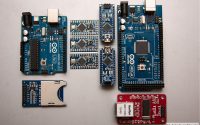
- Parts: Gather the necessary parts, including motors, servos, gears, and a microcontroller. You may also need a power supply and a battery to run the arm.
- Assembly: Put the arm together using screws, nuts, and bolts. Make sure to tighten all connections securely to prevent any looseness in the joints.
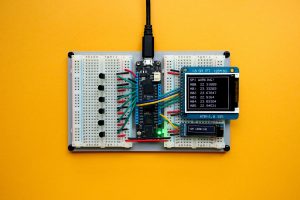
- Wiring: Connect the motors, servos, and microcontroller using the appropriate wiring diagram. Make sure to follow the wiring diagram exactly to avoid damaging any of the components.
- Programming: Use software like Arduino or Raspberry Pi to program the arm. This will allow you to control its movements and have it perform specific tasks.
- Testing: Test the arm to make sure it is functioning properly. Start with simple movements and gradually increase the complexity of the tasks you have it perform.
Building a robotic arm can be a challenging, but rewarding project that will give you a deeper understanding of the technology behind these machines. With patience, dedication, and attention to detail, you can create your own automated machine that can perform a wide variety of tasks.